Pav3d's UV Unwrapping For Beginners Tu...
 Pav:3d
05 Dec 2009
Pav:3d
05 Dec 2009
So you've got your amazing model, people are amazed and are rooting for you to skin it. But you cant, because you have heard the horrors of unwrapping and have never really tried. Any attempt leads to another bill for a new screen and a bandage around your arm. Thus, this tutorial was born!
In this Ill be covering:
-What is unwrapping
-Setting up
-Different types of mapping and their applications
You will need:
-3ds max (You can try to unwrap in gmax, but I almost stabbed a baby in the face trying)
-Patience/Will to do it.
-A model you really like and want to spend time on.
What is unwrapping
In the simplest of terms; unwrapping is telling the model where the texture/skin should go on the model. It is a jigsaw your are putting together in parts so you know which parts are which when you texture/skin your model.
It is not done in Photoshop or any other image tool, its done entirely in a 3d program. I will only be covering 3ds max for this.
There is no really wrong or right way to have your unwrap come out, aslong as you can skin on it properly. A good unwrap can mean an easier skinning/texturing experience.
Btw in unwrapping terms UV's = Faces, same thing for the purpose of this tutorial.
Setting up
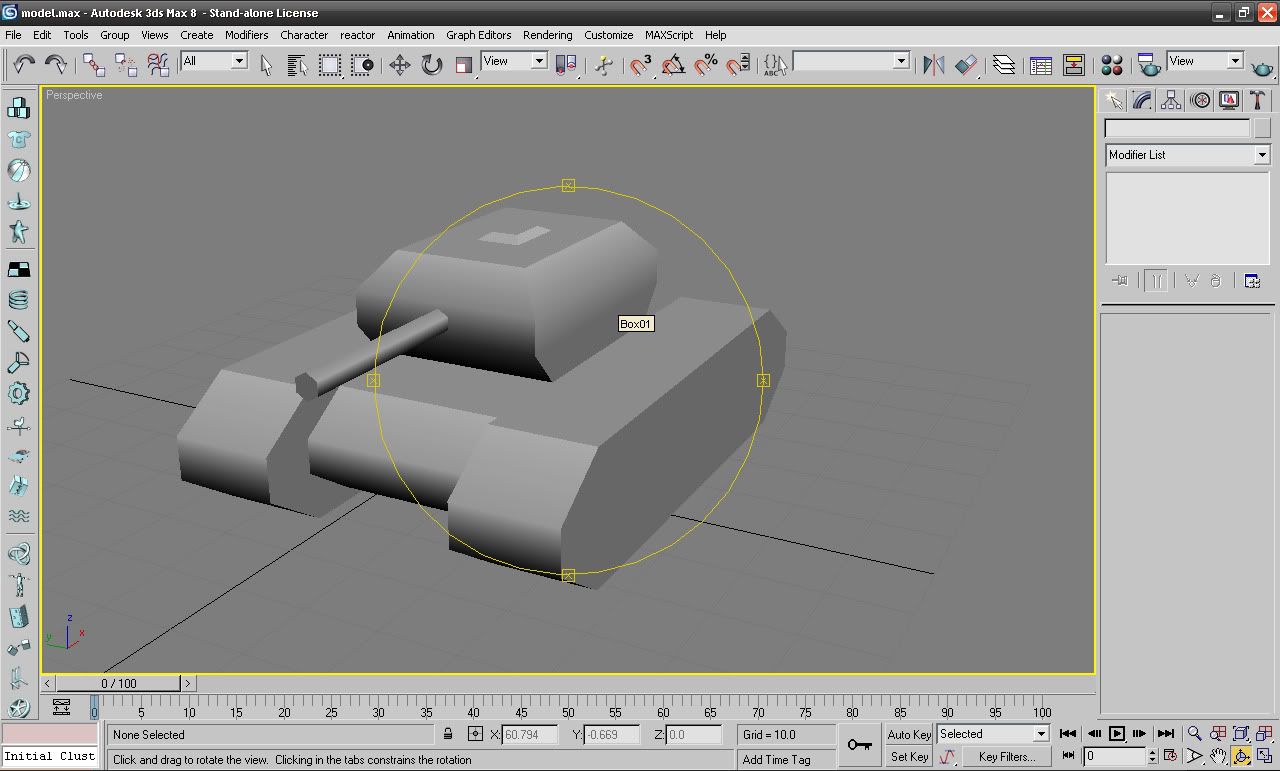
For this tut Ill be using the Pavmobile MKI, dont scroll down too fast, coz it might blow your mind.
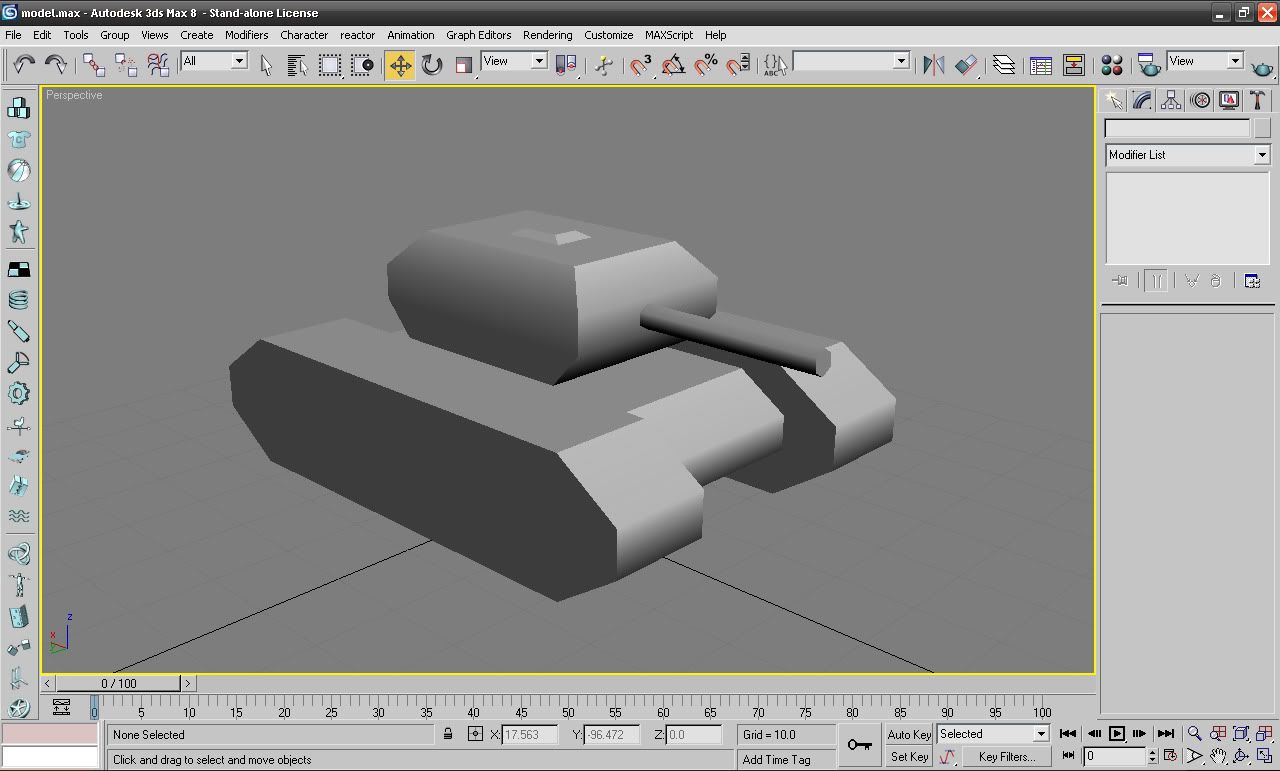
As you can see both tracks are exactly the same. This means we can delete one and then just duplicate it later which saves us time on unwrapping. You can do this with any part of a model you know is going to be skinned the same anyway.
Next attach everything else together if you want to skin it onto just one texture (When starting I would advise just doing that until you are comfortable enough to start using multiple unwraps and textures on one model)
Now pay close attention, coz if you get this next step wrong you arent getting anywhere.
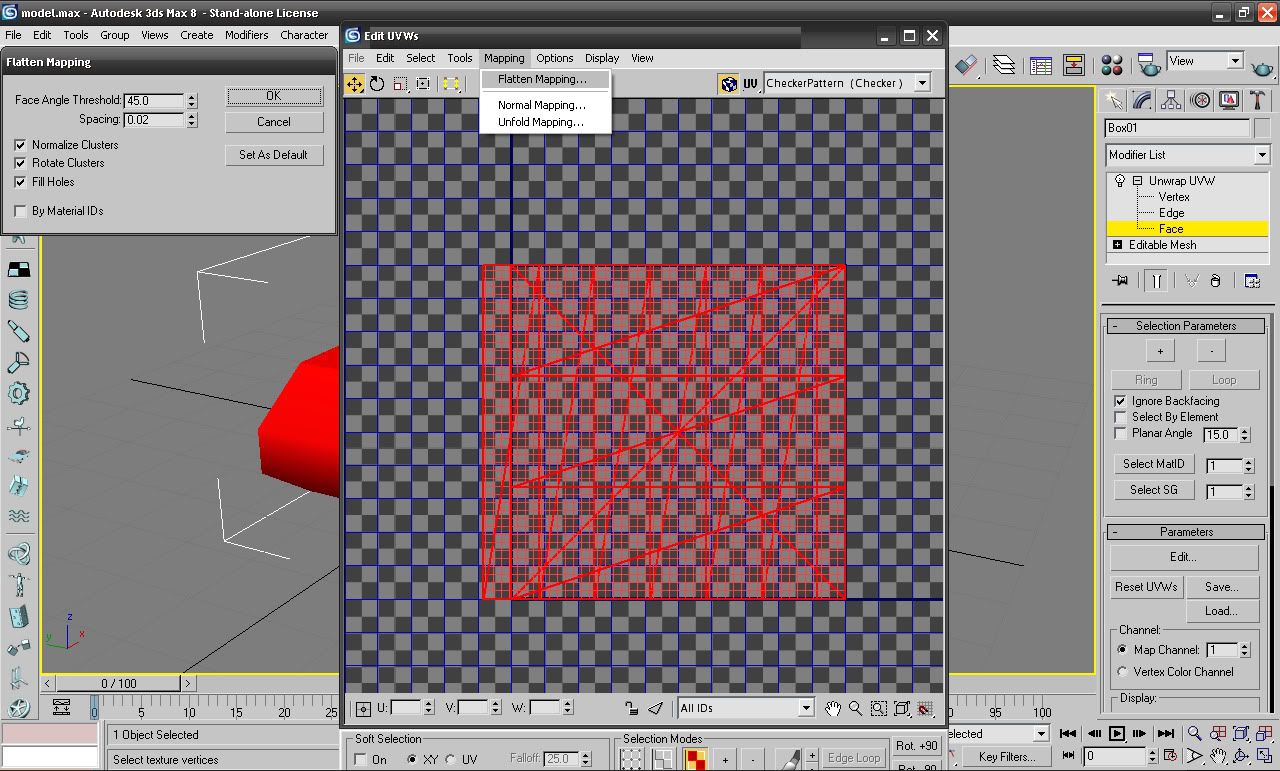
Modifiers -> UV Coordinates -> Unwrap UVW -> Then in the Modifier menu expand the Unwrap UVW and select "Face" -> Edit Button

Woah holy shit a new screen just popped up and its got loads of crazy-ass lines all over it.
Welcome to the Edit UVW's screen, get used to it coz its going to be your best friend for the next hour or so.
These lines are the Faces of the model all jumbled up and waiting for you to organise them.

(Unless mentioned the next part of this tutorial will all take place in the Edit UVW's Window)
You want to have a clearer view of what you're doing so next step is to select all the Faces (Ctrl + A) then: Mapping -> Flatten Mapping -> (Then in the box that comes up) "Okay".
Now you should have something like this:
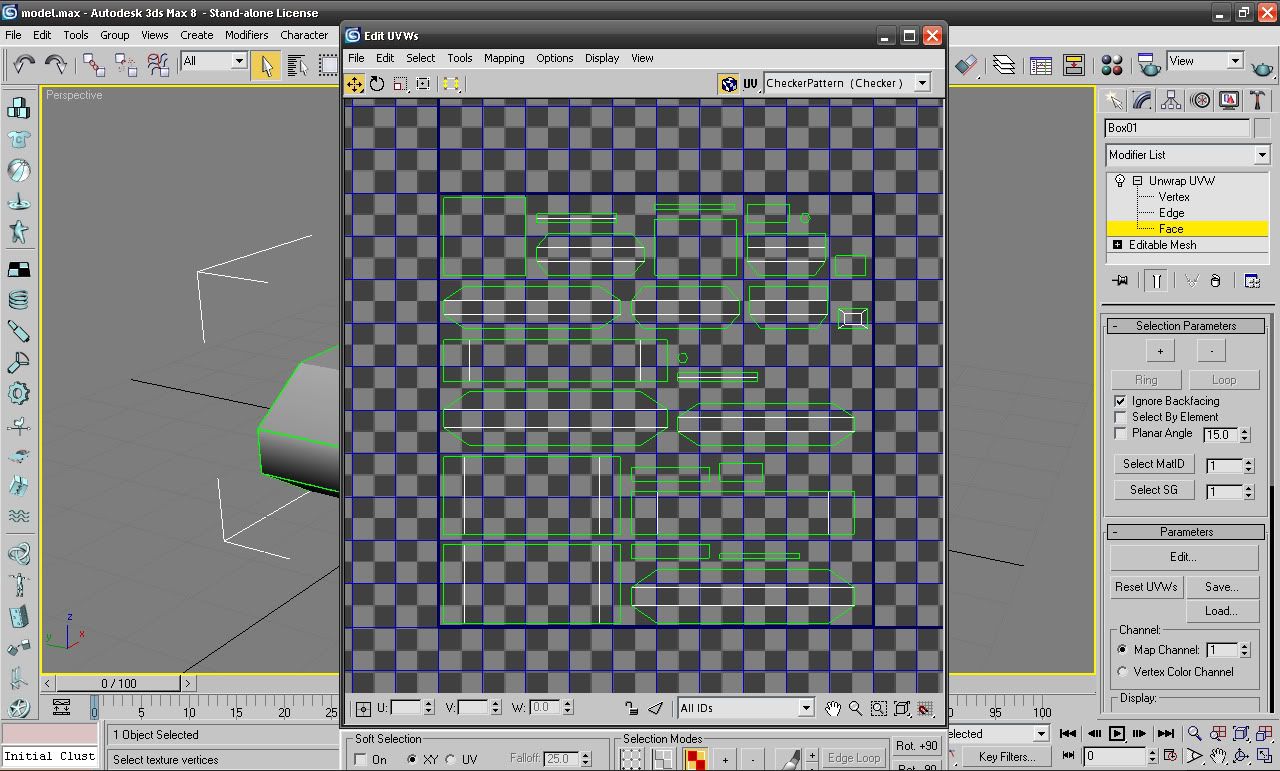
As you can see some faces make sense, and look like recognisable parts of the model.
A quick guide on what the different line colours mean:
-Green means its the edge of the face(s)
-White means its a joint between two faces
-(When a face is selected) The blue lines mean its a joint between the two faces.
>IMPORTANT SECTION IS IMPORTANT<
Guide to important actions in the edit UVW's window.
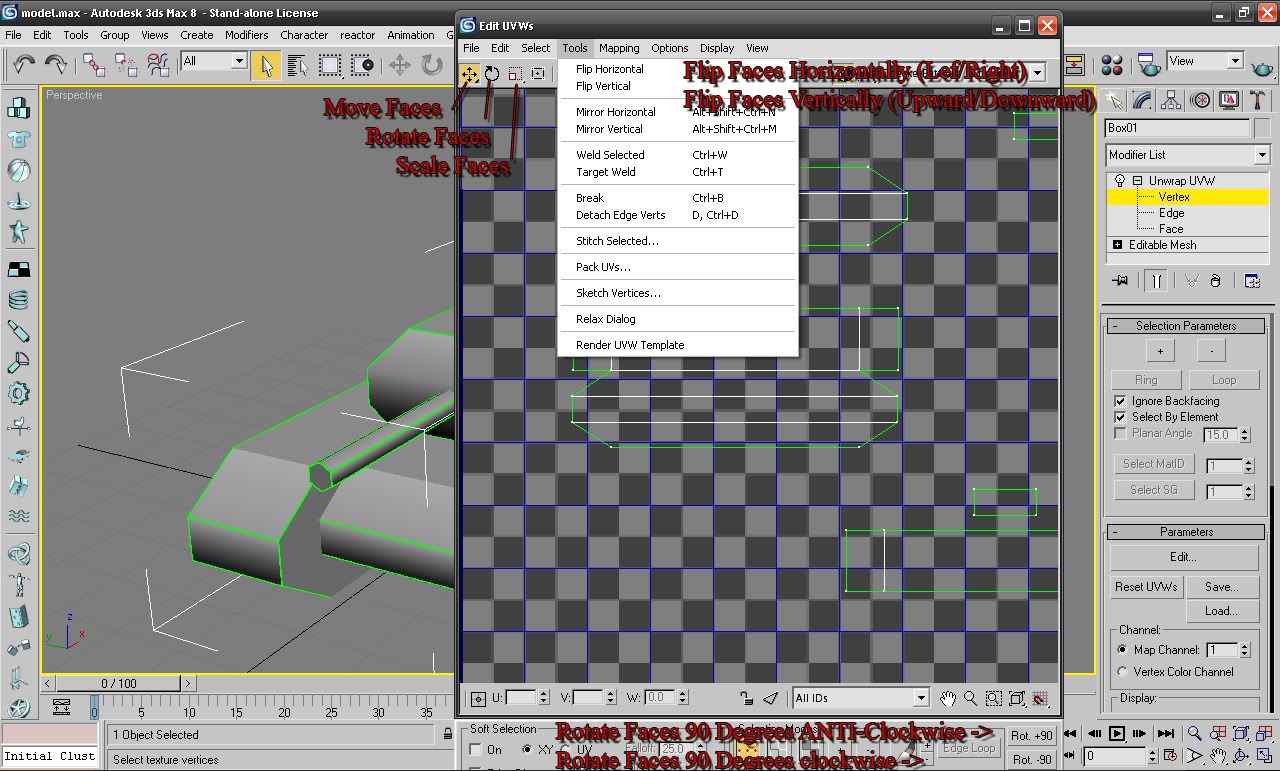
Now let the unwrapping begin.
Basic Unwrapping
So you have all your pieces neatly laid out infront of you select part of it by ticking the "Select by element" box on the right of your screen in the Unwrap modifier toolbar (This allows you to select entire objects and lets you know whats what, untick it to be able to select individual faces). Then in the main viewport (out side of the Edit UVW's window) select part of your model, I choose to start off with my treads.
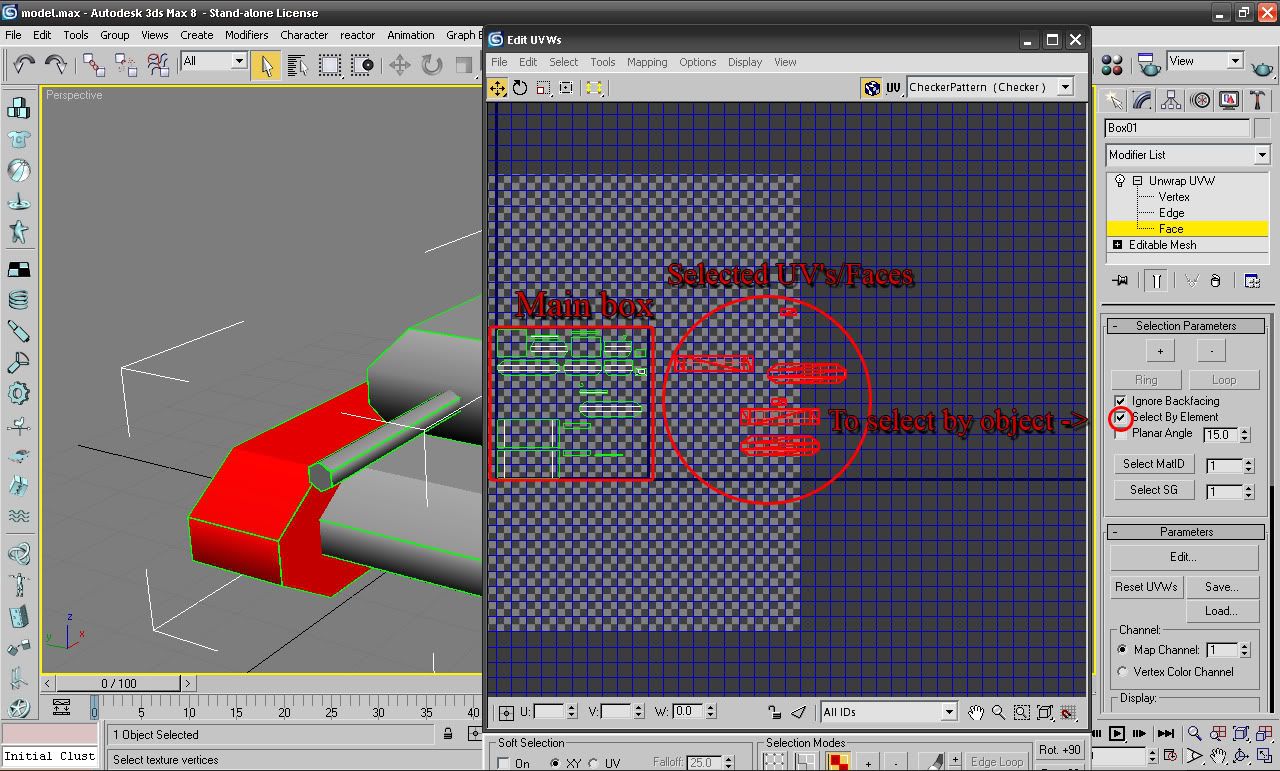
(you can zoom in and out with your scroll wheel, and move it around by clicking your scroll wheel. If you dont have a scroll wheel, buy a better mouse.)
As you can see I moved them out of the main window, for now you can work on the UV's where-ever you want, it only matters at the end where the faces end up, which will be explained later.
Now I can see that with the top face selected the sides can be linked to it (from the line, guide, see above)

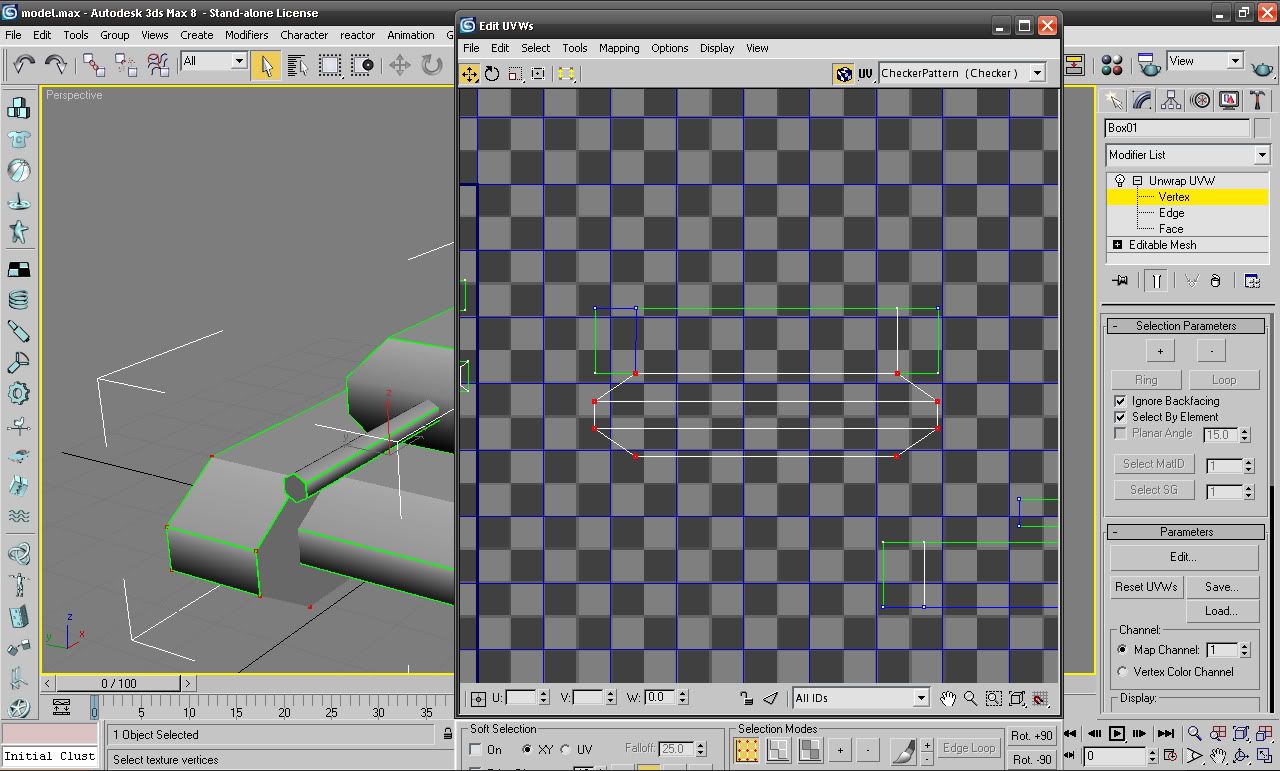
Select a face that links to it and then select "Vertex" in the modifier window on the left
Now you are selecting by the vertexes, which are the points on each edge of the face
This makes it easier to Weld (which will be explained further on) two faces together as you can judge them easier.
Quick Vertex colour guide
-Red is selected vertexes
-Blue is a vertex that links to the selected vertex

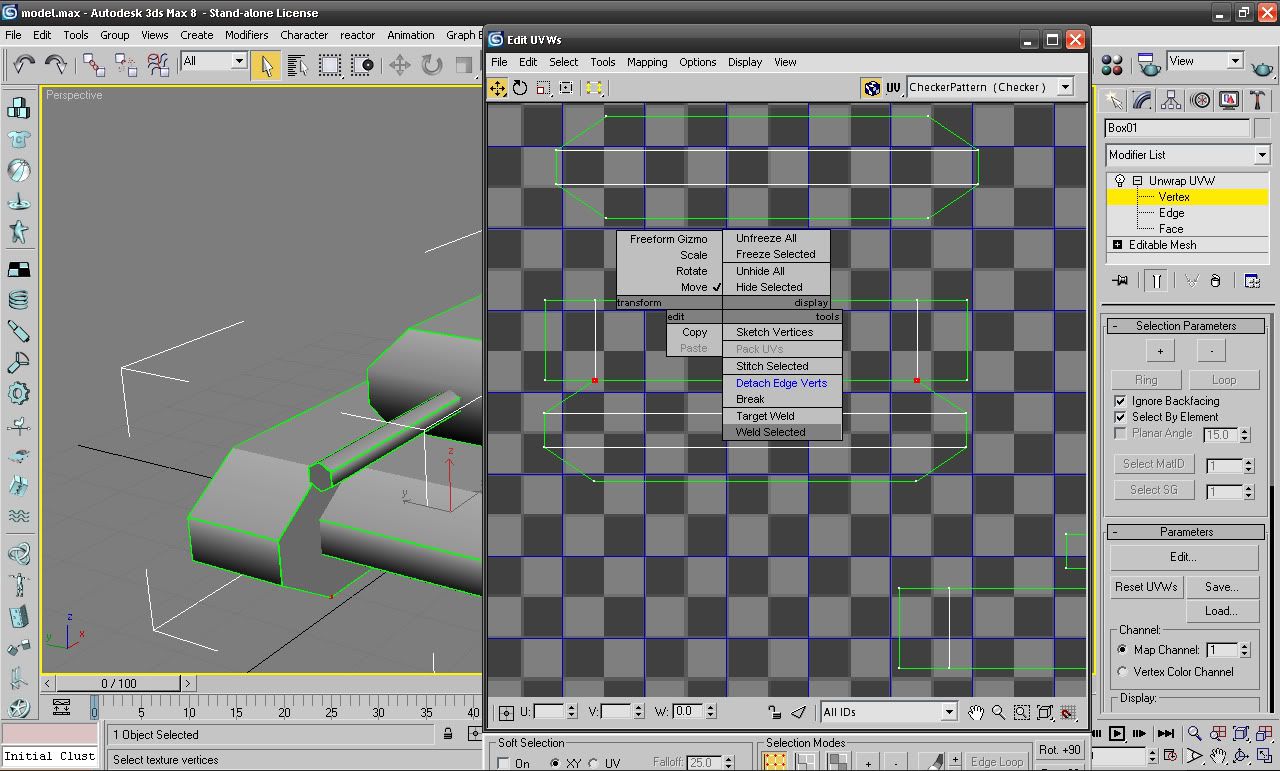
Now you want to weld the faces together so when skinning the texture flows over the edges. Ofcourse you cant weld everything together, so you work in seperate parts.
Now you see there are a few faces that are exactly the same, and will end up being skinned as the same thing. So we want to save space for other UV's and time for when we skin.
So grab your face and place it exactly over the similar one (scroll in to make sure you are aligning them properly) and then select all the vertexes and then right click and "Weld". This welds all the vertexes to one another so now whatever is skinned in that space will appear on both sides of that object.
and you should end up with something like this:
All sides of the face being white means that it is multiple faces on top of each other welded.
Fast forward a bit and this is a partial unwrap of the tank:
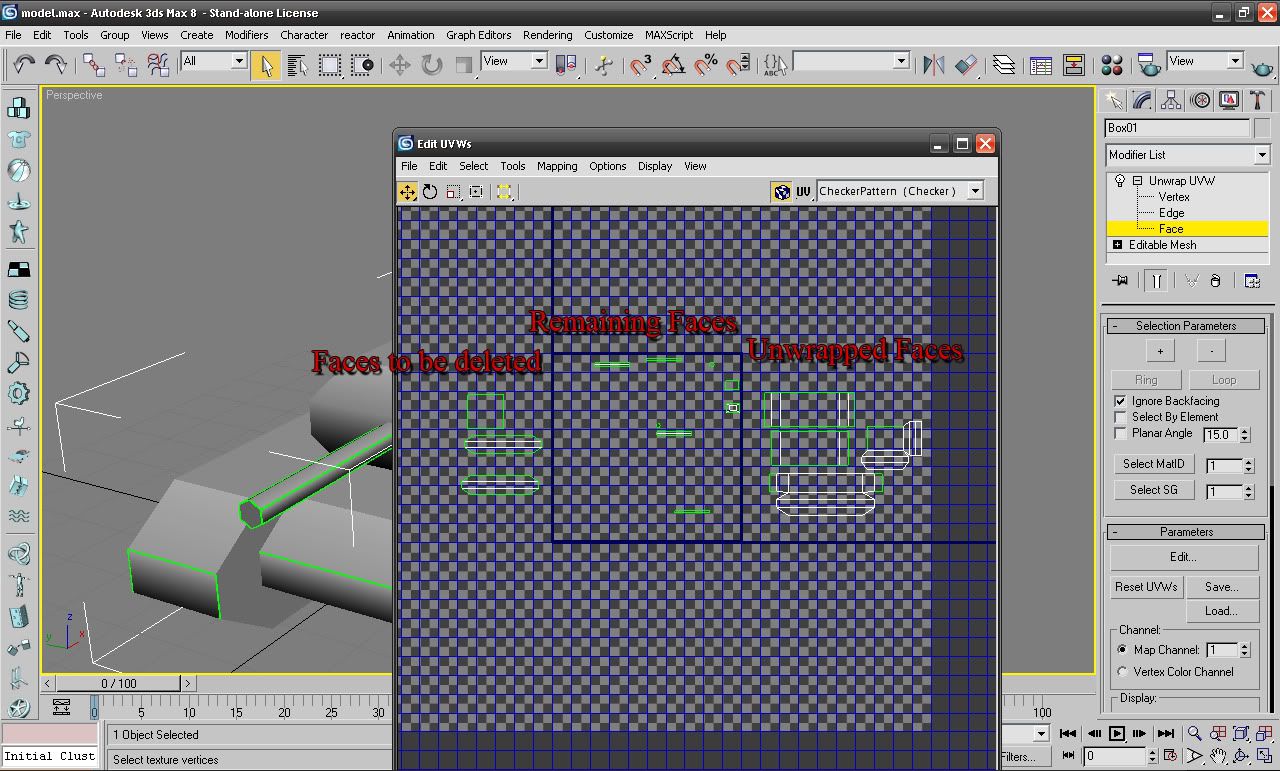
The Faces to be deleted are faces that are permanently obscured by another object and will not be needed at all. I will cover how to delete the faces later on. You can remove useless faces that are joined to others by right clicking (while the face is selected) and then pressing "Detach Edge Verts"
As you can see in my "work area" where the unwrapped faces are I have organised them into somewhat of a box shape. This is to make it easier to organise them later on.
And thats all for the basic unwrapping steps, once you are comfortable with that you can try out Stitching whereby 3ds will automatically stick faces together depending on which edge of another faces you have selected. Its a tricky thing to master since sometimes it will stitch the faces badly. You can find it by right clicking in the edit UVW's window (with a face or edge of a face selected) and pressing "Stitch".
Unfold Unwrapping
This process basically "unfolds" a selected object flat out with its faces linked. Its best used for basic tubes and boxes and can make the process much faster.
Mapping -> Unfold Mapping -> (In the box that comes up) Okay

Woah your object has been expanded to a massive size of itself and is diagonal.
Just use the scale and rotate tools in the edit UVW's window and roughly scale it to its original size

And thats that!
Finishing Up
Move all your UV's into the main blue box and make sure you have all the ones you want in there, with faces to be deleted OUTSIDE of the box.
You should have something like this infront of you:
Now to get rid of those useless faces make sure you have selected "Face" in the modifier drop down list and select them.
Then -and this is very important- right click on the Unwrap UVW modifier and select "Collapse all" This will allow you to edit the model while still keeping your unwrap, your edit UVW's window shall dissapear, but never fear your unwrap is still there and can be accessed just by applying the UVW modifier again.
Then in the "Editable Mesh" modifier select the 3d cube icon and you will see that your faces that you want to be deleted have been highlighted:
Press deleted and theyre gone!
Now you can duplicate the parts of the model which were duplicates before, their unwrap will carry over and overlap when skinning, so will appear the same on either side
Congrats! Your model is now unwrapped!
General Tips, Good Practice etc
-SAVE REGULARLY, there is nothing more rage inducing than loosing a hard worked on unwrap. The CTRL+S shortcut only works OUTSIDE of the Edit UVW's window.
-Use all available space in the main UV box. Will mean you can add more detail to your skin.
-Experiment with different options in the Edit UVW's window, you can always CTRL+Z them away!
-Take your time, nothing more annoying then skinning a lazy unwrap
-Make sure your unwrap is always nice and straight, with low res skinning (IE: textures that are less than 1024x1024px) lines will become jagged otherwise
Once you are comfortable with unwrapping you can get started on skinning: And holy shit, I made a tutorial for that. It covers how to get from unwrapping to skinning.
And thats that! I will add anything I may have forgotten, just need feedback, any links that break let me know! Thanks for reading, I hope its helped you style_emoticons/default/smile.gif
Edited by Pav:3d, 28 October 2011 - 14:32.
In this Ill be covering:
-What is unwrapping
-Setting up
-Different types of mapping and their applications
You will need:
-3ds max (You can try to unwrap in gmax, but I almost stabbed a baby in the face trying)
-Patience/Will to do it.
-A model you really like and want to spend time on.
What is unwrapping
In the simplest of terms; unwrapping is telling the model where the texture/skin should go on the model. It is a jigsaw your are putting together in parts so you know which parts are which when you texture/skin your model.
It is not done in Photoshop or any other image tool, its done entirely in a 3d program. I will only be covering 3ds max for this.
There is no really wrong or right way to have your unwrap come out, aslong as you can skin on it properly. A good unwrap can mean an easier skinning/texturing experience.
Btw in unwrapping terms UV's = Faces, same thing for the purpose of this tutorial.
Setting up
For this tut Ill be using the Pavmobile MKI, dont scroll down too fast, coz it might blow your mind.
As you can see both tracks are exactly the same. This means we can delete one and then just duplicate it later which saves us time on unwrapping. You can do this with any part of a model you know is going to be skinned the same anyway.
Next attach everything else together if you want to skin it onto just one texture (When starting I would advise just doing that until you are comfortable enough to start using multiple unwraps and textures on one model)
Now pay close attention, coz if you get this next step wrong you arent getting anywhere.
Modifiers -> UV Coordinates -> Unwrap UVW -> Then in the Modifier menu expand the Unwrap UVW and select "Face" -> Edit Button
Woah holy shit a new screen just popped up and its got loads of crazy-ass lines all over it.
Welcome to the Edit UVW's screen, get used to it coz its going to be your best friend for the next hour or so.
These lines are the Faces of the model all jumbled up and waiting for you to organise them.
(Unless mentioned the next part of this tutorial will all take place in the Edit UVW's Window)
You want to have a clearer view of what you're doing so next step is to select all the Faces (Ctrl + A) then: Mapping -> Flatten Mapping -> (Then in the box that comes up) "Okay".
Now you should have something like this:
As you can see some faces make sense, and look like recognisable parts of the model.
A quick guide on what the different line colours mean:
-Green means its the edge of the face(s)
-White means its a joint between two faces
-(When a face is selected) The blue lines mean its a joint between the two faces.
>IMPORTANT SECTION IS IMPORTANT<
Guide to important actions in the edit UVW's window.
Now let the unwrapping begin.
Basic Unwrapping
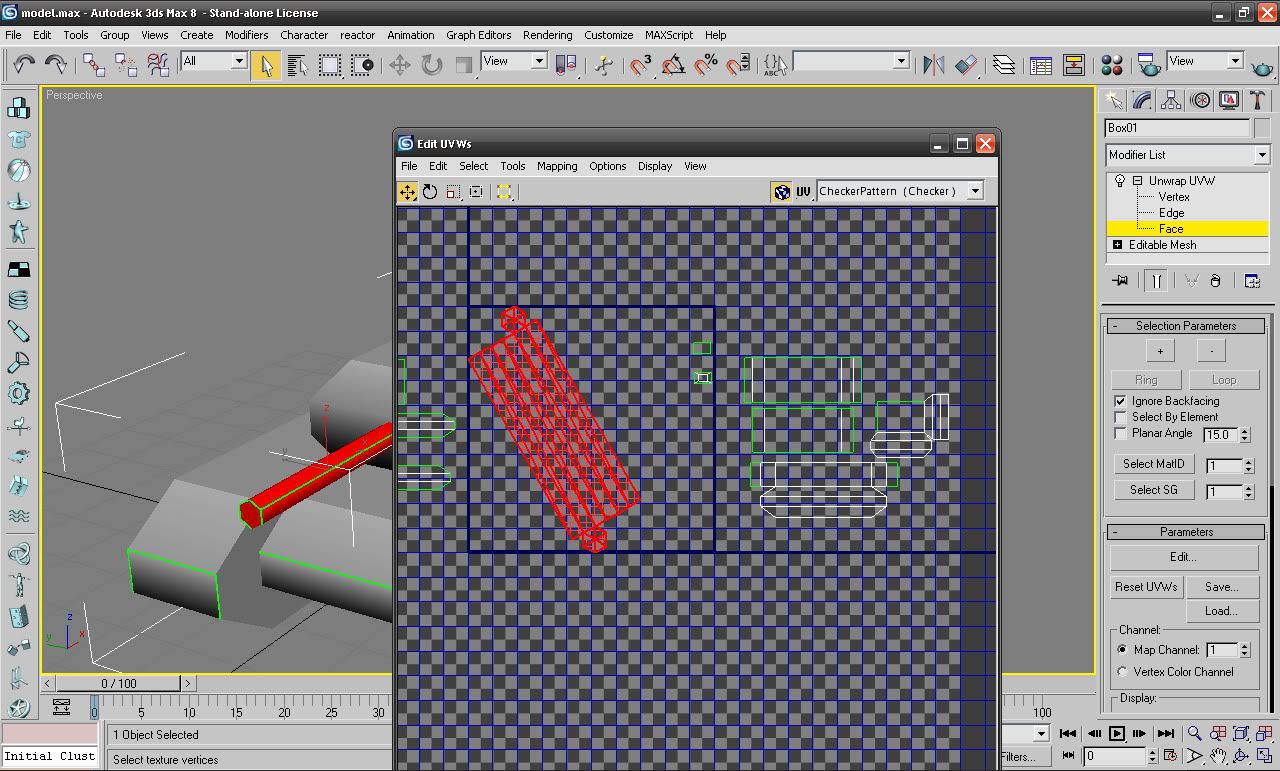
So you have all your pieces neatly laid out infront of you select part of it by ticking the "Select by element" box on the right of your screen in the Unwrap modifier toolbar (This allows you to select entire objects and lets you know whats what, untick it to be able to select individual faces). Then in the main viewport (out side of the Edit UVW's window) select part of your model, I choose to start off with my treads.
(you can zoom in and out with your scroll wheel, and move it around by clicking your scroll wheel. If you dont have a scroll wheel, buy a better mouse.)
As you can see I moved them out of the main window, for now you can work on the UV's where-ever you want, it only matters at the end where the faces end up, which will be explained later.
Now I can see that with the top face selected the sides can be linked to it (from the line, guide, see above)
Select a face that links to it and then select "Vertex" in the modifier window on the left
Now you are selecting by the vertexes, which are the points on each edge of the face
This makes it easier to Weld (which will be explained further on) two faces together as you can judge them easier.
Quick Vertex colour guide
-Red is selected vertexes
-Blue is a vertex that links to the selected vertex
Now you want to weld the faces together so when skinning the texture flows over the edges. Ofcourse you cant weld everything together, so you work in seperate parts.
Now you see there are a few faces that are exactly the same, and will end up being skinned as the same thing. So we want to save space for other UV's and time for when we skin.
So grab your face and place it exactly over the similar one (scroll in to make sure you are aligning them properly) and then select all the vertexes and then right click and "Weld". This welds all the vertexes to one another so now whatever is skinned in that space will appear on both sides of that object.
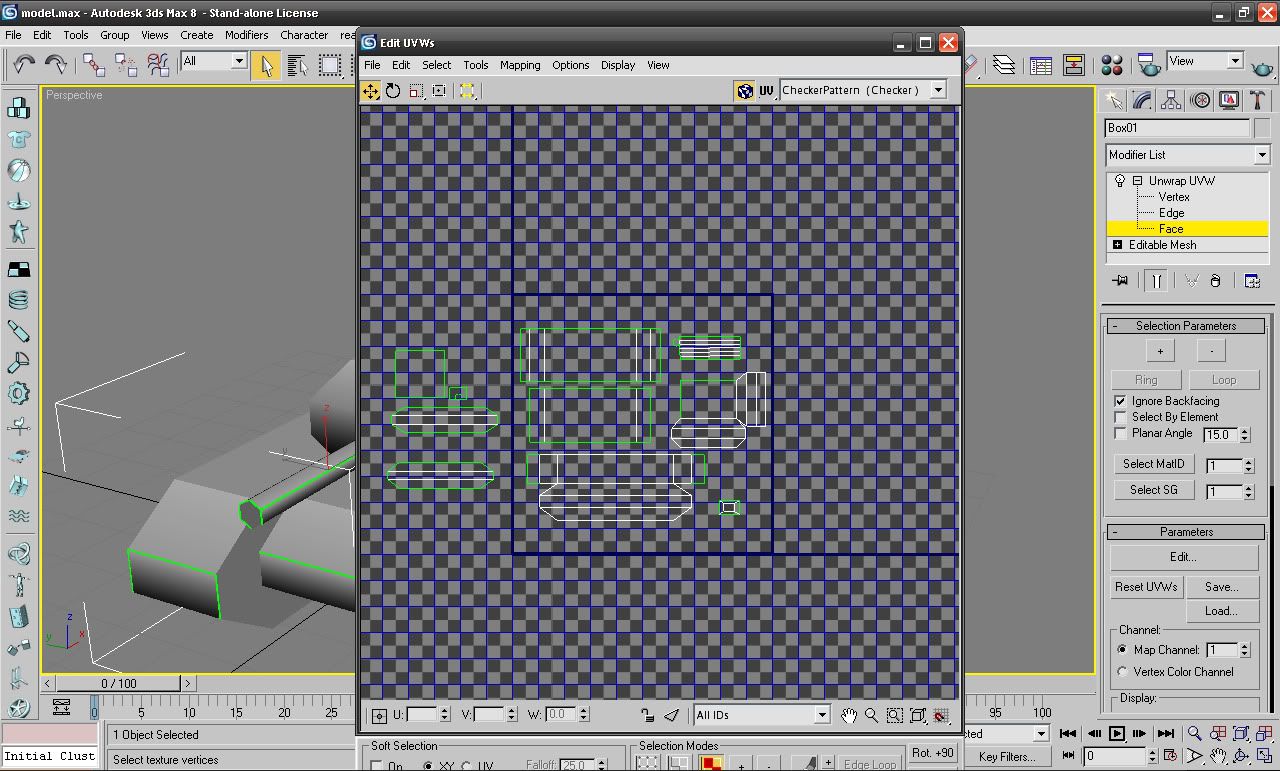
and you should end up with something like this:
All sides of the face being white means that it is multiple faces on top of each other welded.
Fast forward a bit and this is a partial unwrap of the tank:
The Faces to be deleted are faces that are permanently obscured by another object and will not be needed at all. I will cover how to delete the faces later on. You can remove useless faces that are joined to others by right clicking (while the face is selected) and then pressing "Detach Edge Verts"
As you can see in my "work area" where the unwrapped faces are I have organised them into somewhat of a box shape. This is to make it easier to organise them later on.
And thats all for the basic unwrapping steps, once you are comfortable with that you can try out Stitching whereby 3ds will automatically stick faces together depending on which edge of another faces you have selected. Its a tricky thing to master since sometimes it will stitch the faces badly. You can find it by right clicking in the edit UVW's window (with a face or edge of a face selected) and pressing "Stitch".
Unfold Unwrapping
This process basically "unfolds" a selected object flat out with its faces linked. Its best used for basic tubes and boxes and can make the process much faster.
Mapping -> Unfold Mapping -> (In the box that comes up) Okay
Woah your object has been expanded to a massive size of itself and is diagonal.
Just use the scale and rotate tools in the edit UVW's window and roughly scale it to its original size
And thats that!
Finishing Up
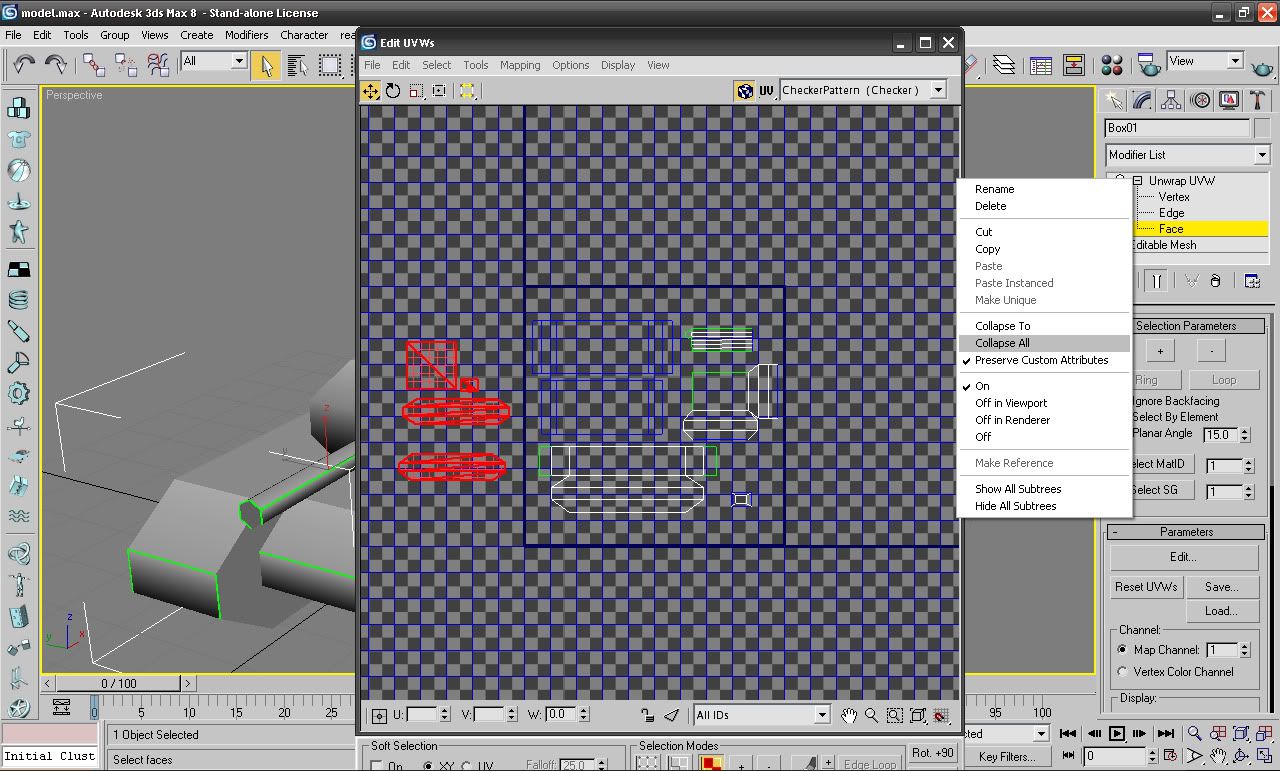
Move all your UV's into the main blue box and make sure you have all the ones you want in there, with faces to be deleted OUTSIDE of the box.
You should have something like this infront of you:
Now to get rid of those useless faces make sure you have selected "Face" in the modifier drop down list and select them.
Then -and this is very important- right click on the Unwrap UVW modifier and select "Collapse all" This will allow you to edit the model while still keeping your unwrap, your edit UVW's window shall dissapear, but never fear your unwrap is still there and can be accessed just by applying the UVW modifier again.
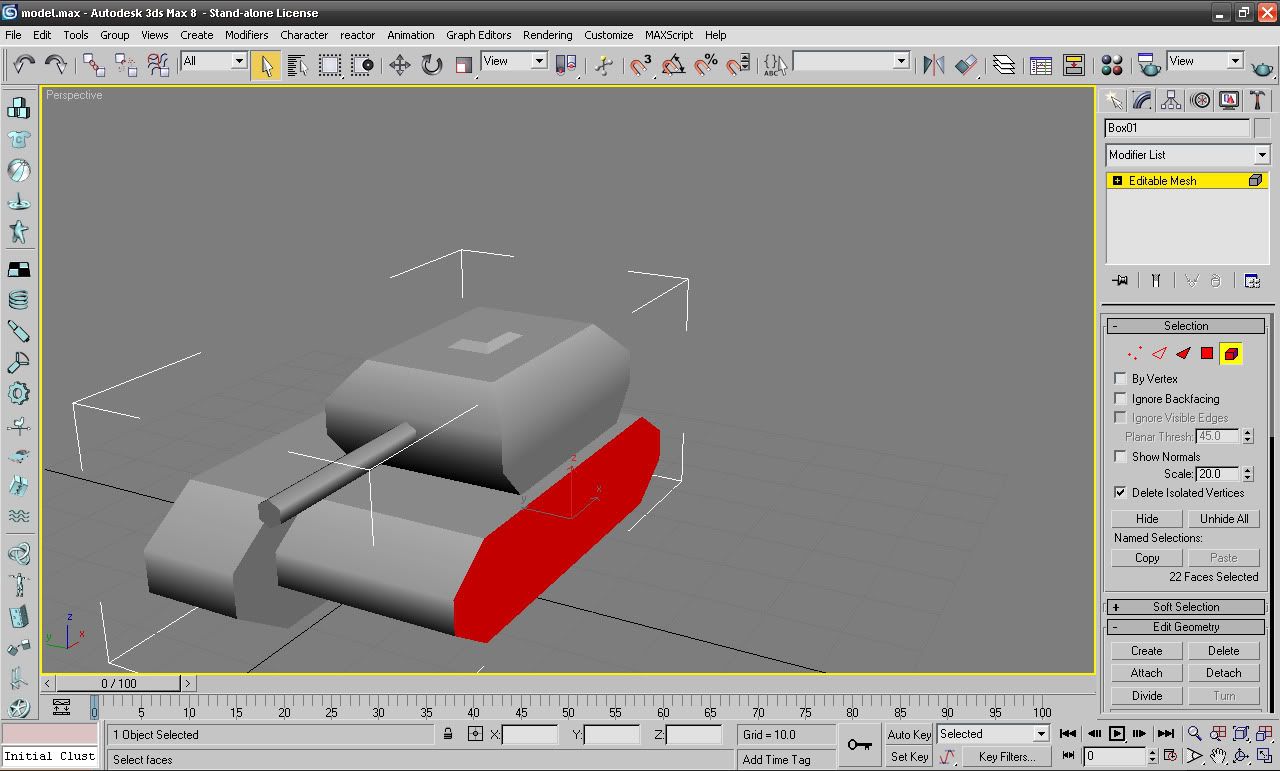
Then in the "Editable Mesh" modifier select the 3d cube icon and you will see that your faces that you want to be deleted have been highlighted:
Press deleted and theyre gone!
Now you can duplicate the parts of the model which were duplicates before, their unwrap will carry over and overlap when skinning, so will appear the same on either side
Congrats! Your model is now unwrapped!
General Tips, Good Practice etc
-SAVE REGULARLY, there is nothing more rage inducing than loosing a hard worked on unwrap. The CTRL+S shortcut only works OUTSIDE of the Edit UVW's window.
-Use all available space in the main UV box. Will mean you can add more detail to your skin.
-Experiment with different options in the Edit UVW's window, you can always CTRL+Z them away!
-Take your time, nothing more annoying then skinning a lazy unwrap
-Make sure your unwrap is always nice and straight, with low res skinning (IE: textures that are less than 1024x1024px) lines will become jagged otherwise
Once you are comfortable with unwrapping you can get started on skinning: And holy shit, I made a tutorial for that. It covers how to get from unwrapping to skinning.
And thats that! I will add anything I may have forgotten, just need feedback, any links that break let me know! Thanks for reading, I hope its helped you style_emoticons/default/smile.gif
Edited by Pav:3d, 28 October 2011 - 14:32.
CJ
05 Dec 2009
You've made a great tutorial here, I found it very easy to understand and really useful especially as I was looking for such a tutorial for a long time 
Now, I can finally skin my models without asking my friends to unwrap them, and for that I thank you a lot
Now, I can finally skin my models without asking my friends to unwrap them, and for that I thank you a lot

Ion Cannon!
06 Dec 2009
Very nice tutorial Pav, maybe i'll make a particle FX tutorial which goes beyond the - Learn what values do, experiment.
Pav:3d
07 Dec 2009
Cheers Ion, the more tuts the better!
Like what? Im curious as I couldnt see myself unwrapping without using everything explained here
 JJ, on 6 Dec 2009, 14:53, said:
Hehe, there are stuff in there that I do not know of. :O
Like what? Im curious as I couldnt see myself unwrapping without using everything explained here
Zeke
07 Dec 2009
JJ, on 7 Dec 2009, 12:22, said:
Unfold and flatten, I do not actually use those. 
neither do I

though I have known about them for a long time, I prefer flatening manually
EDIT: Nice tut thar Pav3d *adds to list of tuts*
Edited by Zeke, 07 December 2009 - 05:04.
Dr. Knickers
07 Dec 2009
Woot, somebody else who UV's like me; I always got the feeling that I was doing something wrong when I UV'd stuff.
Nice tut, it's bound to help tons of people.
Nice tut, it's bound to help tons of people.
Pav:3d
07 Dec 2009
JJ, on 7 Dec 2009, 4:22, said:
Unfold and flatten, I do not actually use those.
I dunno how I'd start otherwise
manual flattening sounds scary...Dr. Knickers, on 7 Dec 2009, 5:30, said:
Woot, somebody else who UV's like me; I always got the feeling that I was doing something wrong when I UV'd stuff.
Nice tut, it's bound to help tons of people.
Nice tut, it's bound to help tons of people.
 same here, I was half expecting someone to comment saying "you're doing it all wrong"
Wizard
07 Dec 2009
Another excellent tutorial Pav3d. Great work as always. I've pinned this and your skinning tutorial to for ease. I'll try and get these onto the wiki at some point or if AJ or Dauth read this, they can.
Libains
07 Dec 2009
Wizard, on 7 Dec 2009, 8:56, said:
Another excellent tutorial Pav3d. Great work as always. I've pinned this and your skinning tutorial to for ease. I'll try and get these onto the wiki at some point or if AJ or Dauth read this, they can.
I'm tempted not to - surely the webby would be better suited for these, as the wiki doesn't really host tutorials and whatnot. I'll link to them for sure, but I'd rather see them on the website

