The 1-2-3's of modeling a tunnel
1: Make object in the shape of the tunnel you want.
2: Flip normals.
3: Delete faces where you want entrances/exits.
Simple enough for someone who knows their way around Gmax/RenX, but what about someone who doesn't know their way around Gmax/RenX? If you're new to modeling, you might have question like this:
• "What is a 'normal'?"
• "What is a 'face'?"
• "How do you flip these 'normals'?"
• "Huh?"
• "What?"
• "Sprechen sie Englisch? ¿Hable Inglés?"
Well, I've comprised a simple, straight forward tutorial to show people the basics of making a tunnel. Specifically we'll make a tunnel out of a box. A simple box, nothing fancy, but this is a tutorial on making a tunnel, not modeling a complex cave system. However, while this may be a simple tunnel tutorial, it includes the same fundamentals that you will be using whether you're making a basic tunnel that connects two sides of a hill or a huge underground tunnel complex sitting under a snow capped mountain.
This tutorial assumes that you've already installed Gmax and RenX, that you know how to open RenX, and that you know how to make a box. If you don't know how to do any of these things, I suggest asking someone before attempting this tutorial.
-----
First off, open RenX.
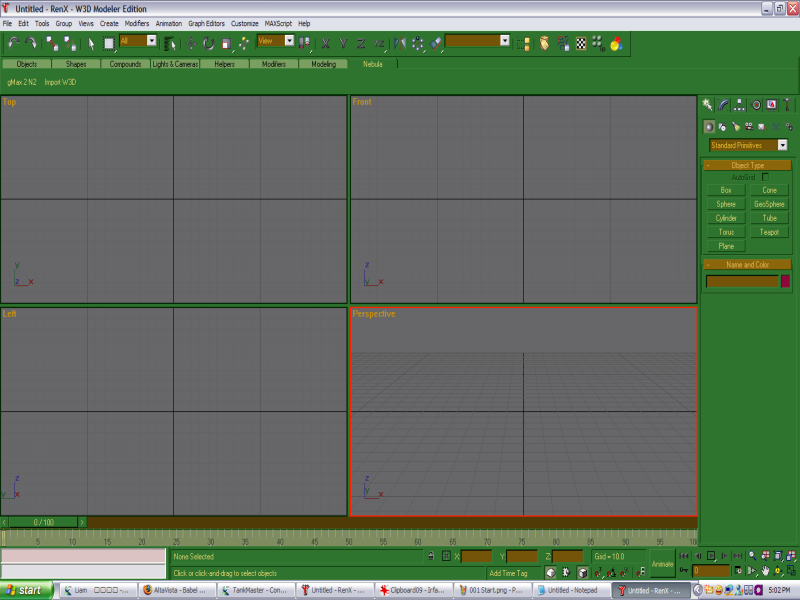
Amazing.
Right, now that we've got it open, lets make a box.
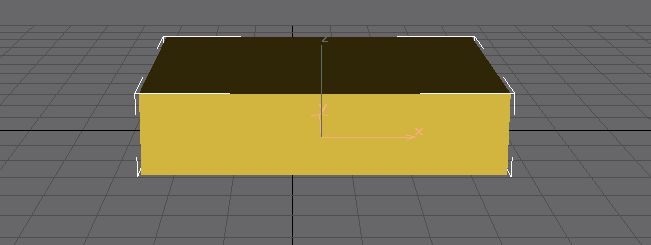
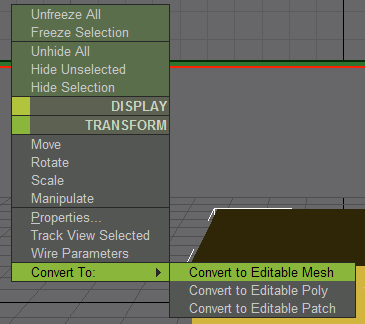
Now right click somewhere in the same view window as the box. A menu should appear. Go down to "Convert To:" and click on "Convert to Editable Mesh".
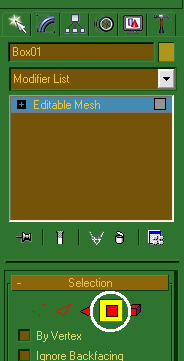
On the right part of your screen it will have changed to something similar to the image below. Click on the red square (in the picture I've indicated it with a white circle).
* Clicking the red square will allow to you select "faces". Hold the mouse over the different symbols to show what the different choices are.
Go up to the menus at the top of your screen and click on "Edit". Then go down and click "Select All".
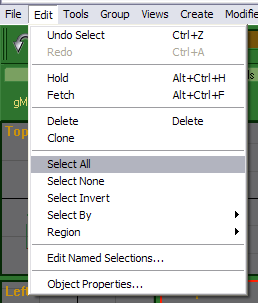
As you can probably guess, this will make it select all the faces.
Go over to the area on the right where you clicked the red box. Scroll a ways down to "Surface Properties", there you'll find a button in a subsection labeled "Normals" that says "Flip". Click it.
* A "normal" is the side of face that you can see. The reason you want to flip the normals is because you want the players to see the inside of the tunnel.

This is more or less what you should see.
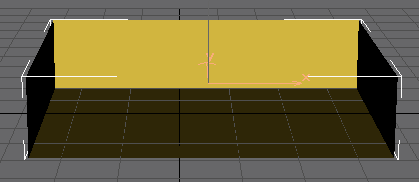
Notice how you can see the inside of the box?
* Hey, where did two of the faces go? Don't worry, they're still there. When you look at a face from behind (that is to say, from a direction that the face's normal isn't showing), you can see right through it.
Now we need to select the faces where we want to have the entrances/exits. In the image below I've selected the faces on the left and right sides of the box (as indicated by the white arrows).
To select an individual face, left-click on one of the faces.
* If you want to select more than one face: After you've select one face, hold down "Ctrl" and click on a second face.
* Remember that even if you can't see the normal of a face, you can still select it when you click on it. Be careful when selecting faces that you're clicking on the ones you want and not accidentally clicking on the ones you can't see.

Press the "Delete" key on your keyboard to get rid of the faces you've selected.
Now your box should looks similar to this:
[img]http://i104.photobuc...s/009Delete.png
-----
You have a model of a basic tunnel! Now go find out how to manipulate object shapes and try making some tunnels with turns in them.
There are, of course, several ways of making a tunnel. This just happens to be the simplest way I can think of.
Extrude:
This is good for making walls and such.
Go to the modify tab and select an edge on your edible mesh.
[img]http://i104.photobuc.../Extrude001.png
Click the up arrow to the right of where it says "Extrude". It will create a new face attached to the edge(s) you selected.
When you click the arrow, the face it creates will be very small. In this picture I've already resized it a little to make it more obvious.
[img]http://i104.photobuc.../Extrude002.png
NOTE: The face you create by extruding may be facing the wrong direction. If you can't see the surface of the face, check the other side of it. Use normal flipping to correct any faces that aren't facing the direction you want them to be.
NOTE: You can extrude other things than just edges using the extrude button. By extruding while in face selection you can extrude the entire face instead of just one edge. By pressing the down arrow instead of the up arrow while in face selection you can make the start of a cave or indent.
Divide:
This is good for adding detail to models that you've already modified.
Go to the modify tab and select an edge on your edible mesh.
[img]http://i104.photobuc...p/Divide001.png
Click "Divide" (right above the extrude button), click where on the selected edge you want to have a new vertex, click "Divide" again (to deactivate it), and switch to vertex selection to move your new vertex to where you want it to be.
[img]http://i104.photobuc.../Divide002b.png
How many polys does it take to make a detailled Renegade map?
That depends a lot on the size and the complexity of the map. RA_Crystallized will be around 20,000 I think, but remember that it is very large and tunnel heavy. In contrast, RA_Cellar_Maze is sitting at around 5,000-6,000 even after I've added a sea cave, two bases, a unique bunker entrance, a few more tunnels, and expanded the complex (stuff that I'll show off in the next update
In case you didn't already know, VIS editing basically makes it so that if you can't see something your processor won't draw it.
Edited by Revantheemperor, 03 November 2007 - 14:09.


